ALO Photo Sphere Setup
Unpacking & Installation Guide
Contents
Before opening the wooden box, check the Tilt Watch color.
- ALO Photo Sphere semi assembled and external light
- Accessory Box : power supply, 5 turntables, holder for smily table, macro lens, ALO Photo Sphere USB connection cable, camera holder, 4 wheels (2 with stops and 2 without), wax, documents.
Useful Tools : scissors, Allen key n°4, screwdriver, wrench, slotted screwdriver.
Unpacking
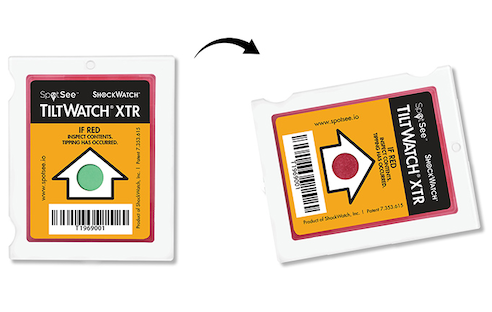
Pay attention to the TiltWatch's color before opening the wooden box!
Cut off the black bands around the wooden box and loosen the screws using the screwdriver. There are 6 screws in the long side, 3 up - 3 down, and 4 in short side, 2 up and 2 down.
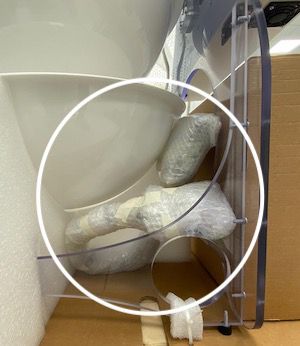
Once opened, remove the bubble wrap protection from the whole machine.
Cut off the white plastic clamps from the machine structure and from the side where is fixed the accessory box.
Hemispheres and Backside Diffuser
Take away the semi-sphere, remove the external and internal protections
Place the Semi-Sphere on the central part and lower the two black hinges. Remove the four screws, already pre-inserted, raise the two black hinges and insert again the four screws using the allen key n°4.
Connect ends of the cables behind the hemi-spheres.
Inside the wooden box there are two diffuser : one white and one back for background purpose.
Unroll the white one and place it in front of the back lights and fit the holes in the screws of the central part.
Wheels and Turntables
ALO Photo Sphere has the pre-inserted rubber feet but it's possible to replace them with wheels.
To do that unscrew with your hand the rubber feet and screw the wheel using a wrench.
Place the two wheels with stop in the frontal part and the two ones without in the back.
Remove the plastic protection from both sides before placing the tables.
To insert the turntable, fit each rolling bearing into his groove.
ALO Photo Sphere has 5 different turntable :
-
Matte and Glossy White
-
Matte and Glossy Black
-
Transparent
-
Smiley
-
Glossy White (both sides)
Each turntable has a small point in the middle to help in place objects in the center. We do suggest to put the transparent table as per default to get pictures directly in white background and place over it the others turnatbales to create effects such as reflection or shadow.
Camera Holder and Cables
Remove the protection and cut the transparent envelope containing the screws. Place the support in the lower end of the black hole and fix the 2 screws using Allen key n°4. Make sure all the screws are tightened enough.
Add our macro lens in the end of 18-135 zoom lens, the one recommended. Screw the camera in the holder using a slotted screwdriver,the gray screw to the end bottom and regolate the blue knob to keep the zoom lens.
The holder is already fixed to the right distance: 125mm.
Connect the camera USB cable (not included in our accessory box), one end in lateral camera body and the other one in ALO Photo Sphere USB port on the right. Then, connect power supply behind the lights control box and the white cable, one end near button On/Off and the other one to the PC.
External Spotlight
Take out the external light and remove the protection
Add to the side of ALO Photo Sphere the external light,instead of the transparent block on left using an Allen key n°4.
After screwed, remove the white cable from the lower semi-sphere and connect with the external light's cable.